Optimization of Die Casting Processes Using Infrared Thermography
D. L. Simon
General Motors, Detroit, MI USA
J.C. Lafeber, P.E.
North Coast Industrial Imaging, Port Huron, MI USA
ABSTRACT
A very critical point to reach in any die casting process is thermal balance. This steady state thermal equilibrium point is arrived at by the die casting machine in conjunction with all of the other parameters which can affect the process. Parameters include molten metal temperatures, die lube spray amounts and location, cycle times, die cooling systems, machine down times, etc. In this paper, the uses of infrared thermal vision systems capable of radiometric measurements are discussed as applied to several different die casting processes supplying parts for the auto industry. Key to these many uses are the goals of reduced cycle times, low scrap rates and maximized up time of the die casting process in supplying quality parts on time. In addition, die cast machine reliability and maintainability will be discussed with respect to infrared thermal imaging. Items such as electrical supply, motor control centers, hydraulic systems, hot oil baths, insulation breakdown can all be observed and optimized for maximum throughput. Finally, the idea of tying these measurements together into die cast process control using a dedicated robust infrared thermal machine vision system will be discussed.
INTRODUCTION
The history of die casting goes back nearly 200 years to the production of moveable type for printing presses. Die casting is a metal casting process that is characterized by forcing molten metal under high pressure into a mold cavity. The mold cavity is created using two hardened tool steel dies which have been machined into shape and work similarly to an injection mold during the process. A critical parameter in all die casting process regardless of metal is heat. Heat can be a friend or foe in the die casting process. Too much heat applied to the molten metal yields longer cooling times, longer cycle times, and in these days of rising energy costs – increased energy cost.
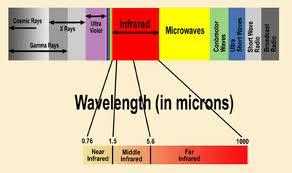
Infrared thermography – or thermal imaging - detects radiation in the infrared range of the electromagnetic spectrum and produce images of that radiation, called thermograms. Since infrared radiation is emitted by all objects above absolute zero according to the black body radiation (Planck's) law, thermography makes it possible to see one's environment with or without visible illumination. The amount of radiation emitted by an object increases with temperature, so thermography allows one to see variations in temperature.
Figure 1 – The Electromagnetic Spectrum
Over the past several years, the cost of ownership of thermal imaging devices has continued to drop. Both handheld imaging devices and fixed mounted camera suitable for process monitoring / process control have become much more affordable. This pricing trend makes thermography a much more viable option for the die casting industry. In this paper, the use of both handheld imaging devices and fixed mounted cameras will be examined.
CAUTIONS REGARDING THERMAL IMAGING
Before some very exciting success stories in thermal imaging can be reviewed, there are three primary cautions that must be discussed. Properly addressing these areas is critical to sustained success with thermography, but all three are often overlooked by many in the pursuit of quick results.
EMISSIVITY
Emissivity is a term representing a material's ability to emit thermal radiation. Every material has a different emissivity, and infrared spectroscopy uses these differences to detect, identify, and quantify materials. A material's emissivity can range from a theoretical 0.00 (completely not-emitting) to an equally-theoretical 1.00 (completely emitting); the emissivity often varies with temperature. An example of a substance with low emissivity would be silver, with an emissivity coefficient of .02. An example of a substance with high emissivity would be asphalt, with an emissivity coefficient of .98. However, emissivity can present significant challenges to the thermographer. As Huang examined in his 2003 paper 1, emissivity increases (or improves) over time as the tool steel becomes oxidized. The thermographer must take this emissivity into account, or the data collected becomes less accurate and less relevant to the process. As the table that follows demonstrates, emissivity can vary dramatically based on temperature and degree of oxidation.
Table 1 – Tool Steel Emissivity
Material
|
Temperature
|
Emissivity |
| Tool steel Type 301, polished |
24º C |
0.27 |
| Tool steel Type 301, polished |
232º C |
0.57 |
| Tool steel Type 301, polished |
949º C |
0.55 |
| Tool steel Type 303, Oxidized |
316 to 1093º C |
0.74 to 0.87 |
DESIGN OF EXPERIMENT
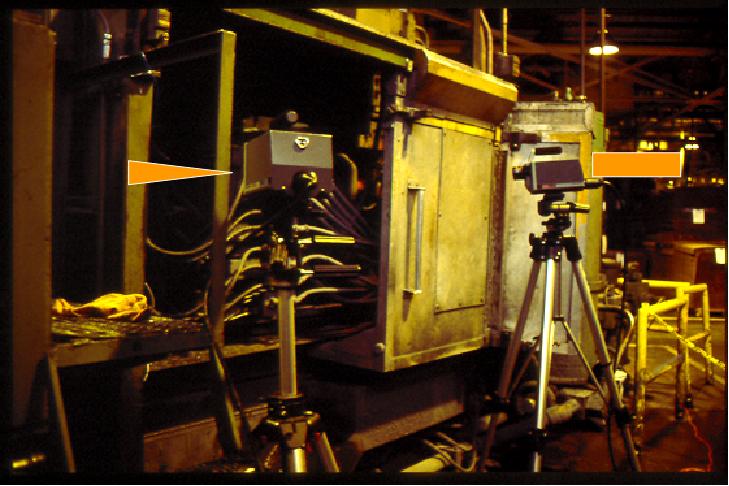
The thermographer must take into consideration a number of variables when designing a thermal experiment. As discussed previously, the proper determination of emissivity is essential to a proper thermal experiment. In addition to emissivity, a number of other parameters must be considered including ambient temperature, layout of the process, material being cast, cycle time (both desired and actual), design of cooling lines, die lubrication, and many others. The picture to the right is a set up for a die casting thermal experiment. As you can see, two cameras are in place at the proper height and angle to to allow maximum view of each die face.
Figure 2 – Typical Thermal Experiment
Training of Thermographers
As with many professions and technologies, thermography has a body of standards and a certification process. While practical experience is important in the development of a thermographer, it is critical that proper training also be made available. Ideally, the training process should include formal training, mentoring by an experienced thermographer, and hands-on experience in the field. Several standards are in place for thermographer training and certification, including the following:
- ASNT-SNT-TC-1A governs recommendations for thermal/infrared testing, as established by the American Society for Non-Destructive Testing (ASNT)
- EN473 covers recommendations for qualification and certification of non-destructive testing (NDT) personnel, as established by the European Federation and accepted by the American Society of Mechanical Engineers (ASME)
- ISO 9712 specifies proficiency in infared thermographic testing as related to the qualification and certification of personnel involved in non-destructive testing (NDT), as established by the International Organization of Standardization (ISO)
- ISO 18436-8: Requirements for thermography training and certification of thermography personnel in condition monitoring and the diagnostics of machines, as established by the International Organization for Standardization (IS0).
A summary of the certification levels according to ISO 18436-8 are as follows:
- Level I Infrared Thermography Certification. Level I thermographers are typically new to infrared thermography. Level I thermographers generally follow a written test procedure to evaluate specific types of equipment in their facility. They can operate their infrared cameras and software and identify and measure thermal anomalies based on thermal patterns, comparisons with similar equipment, and their own experience.
- Level ll Infrared Thermography Certification. The second level of infrared training is Level II. Typically, Level II professionals are experienced thermographers and troubleshooters. Usually deploying more than one diagnostic technology to determine the root cause of a problem the Level II expert will recommend repairs. Because of their more advanced IR training, Level II thermographers are qualified to provide technical direction to Level I certified personnel.
- Level lll Infrared Thermography Certification. This is the most advanced infrared certification level available. A Level III thermographer is primarily a thermography program manager who writes the company's written predictive maintenance/inspection practices, develops the test procedures and severity criteria, determines how often equipment should be inspected, and calculates the return on investment the thermography program is providing. By achieving this advanced infrared certification, a Level III thermographer can provide guidance to Level I and II certified personnel. The Level III thermographer is the resource to consult when repeat equipment problems necessitate a review of operating and maintenance procedures, or involve a redesign of equipment.
THE OPTIMIZATION PROCESS
An organized, structured approach must be followed to maximize the success of a die casting optimization project using thermal imaging. While there are many paths that can lead you to success, the following process has been proven successful over years of process improvements. The basic process starts with a thorough review of the process using a handheld thermal imager, follows with a structured data gathering process using a convertible thermal imaging camera (a device that can be used both in a handheld mode and then mounted using a tripod mount for capturing streams of data, designing a dedicated process monitoring application using fixed mount thermal imaging devices, and establishing an on-going mechanism for evaluating the data that is captured systematically. These basic steps are as follows:
- Initial Review. A handheld thermal imaging camera with a resolution of at least 160x120 pixels (higher resolutions such as 320x240 and 640x480 are more desirable but also add cost) can be used to capture thermograms for subsequent review. It is important to choose a camera that allows images to be captured and stored on an SD-RAM card for subsequent analysis with appropriate thermographic software. This data can be used to provide an initial evaluation of an experiment by observing thermal patterns. The analysis in this process step can be used as the basis for a prototype process monitoring solution.
- Prototype Monitoring System. Many infrared camera OEMs offer imaging devices that can be used as both handheld and fixed mount devices. These devices generally have a standard tripod mount, and the capability to capture a stream of thermal data either using a frame grabber or by connection to a computer with IR software that provides for the capture of streams or stacks of thermal data. Based on assumptions and theories generated during the initial review, this prototype application can be set-up to prove (or disprove) the theories established. Again, the captured streams of thermal data are evaluated to determine if the application can effectively monitor and control the die casting process. The prototype system can be modified to adapt to incorporate results obtain in this phase and to provide better monitoring in the ultimate system.
- Thermographic Monitoring System. As with the handheld thermal imaging devices, fixed mount process cameras come in a number of different resolutions from 32x31 pixels to 640x480 pixels or more. Key factors in determining the appropriate device include the size of the part, the distance that the camera can be mounted from the part, and the size of the potential problem area. While cameras with higher resolutions produce much more attractive images, care should be taken to select a camera that can effectively control the process – while not always providing the most exciting graphical results. An optimal process control system will allow the user to select Regions of Interest to be monitored, establish temperature thresholds for each region of interest based on the data obtained in previous phases, and thermal alarm outputs that notify the user that temperature alarm conditions have been met – or in some cases, provide direction to a process control system that actually provides adjustments to your equipment.
- Data Evaluation. As determined by the thermographer and process engineers, data should be captured and analyzed periodically to identify trends and to provide additional information for optimizing the process. Steams of images can be captured periodically – or an imaged captured every 100 shots. This step is essential to providing a continuing program of process improvement.
PRACTICAL APPLICATIONS OF THERMOGRAPHY TO OPTIMIZE DIE CASTING
The following practical applications of thermal imaging are used for illustration purposes. The number of potential applications for thermal imaging is limited only by your innovation and imagination
COOLING LINES
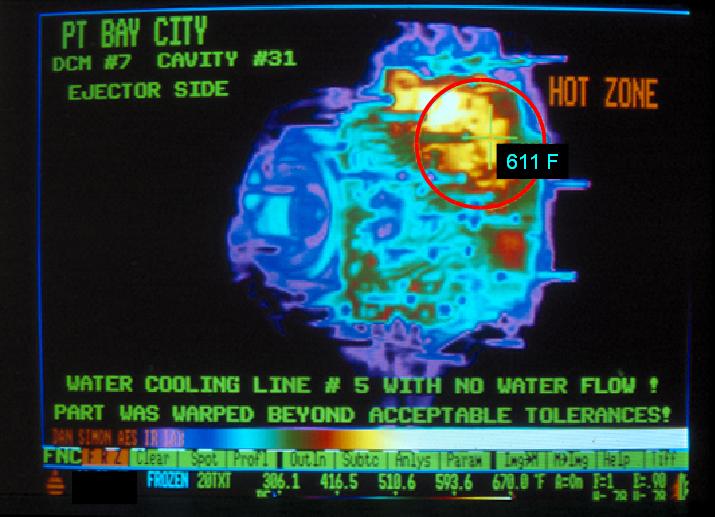
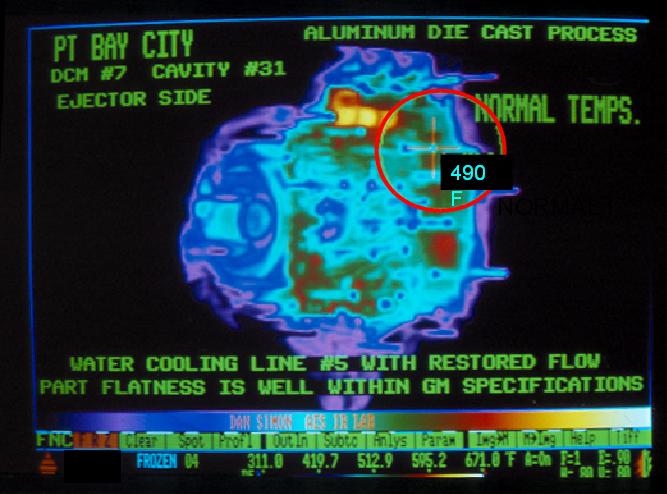
One very practical application of thermal imaging in the die casting process is the identification of hot spots due to improper water flow. It is essential to ensure turbulent water flow to maximize the cooling ability of the water. With turbulent water flow, all of the water comes into contact with the die at some point during the cooling flow due to the random nature of the water flow. This can be contrasted to laminar (or smooth) water flow where only the water molecules closest to the die surface actually provide the majority of the cooling – which is minimal at best. The following images demonstrate the ability of thermal imaging to identify improper water flow.
Figure 3 – Improper Water Flow Figure 4 – Restored Water Flow
MULTI-MACHINE PERFORMANCE COMPARISON
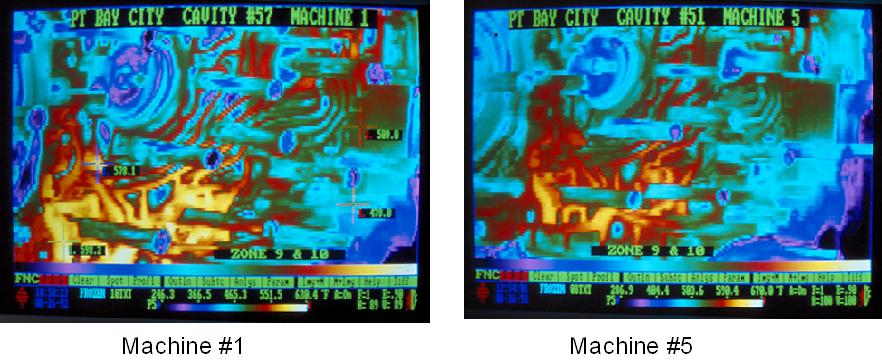
In many die casting facilities, there can be more than one die casting machine making the same part. This provides an excellent opportunity for a multi-machine performance comparison. While no two machines will be perform exactly the same, there should be a strong consistency of the heat signature of identical machines. In the example that follows in Figure 5, two identical die casting machines have very different results. In fact, in the example – Machine #1 has three times as much die surface over 310º C as does Machine #5. This result is a trigger to search for the root cause of this significant difference.
Figure 5 – Multi-Machine Performance Comparison
OPTIMIZATION
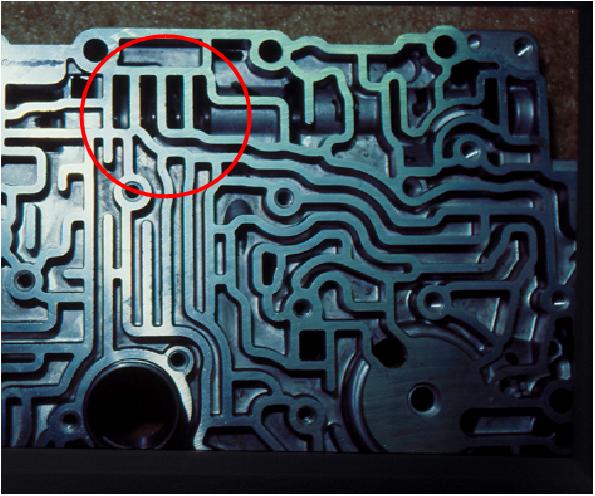
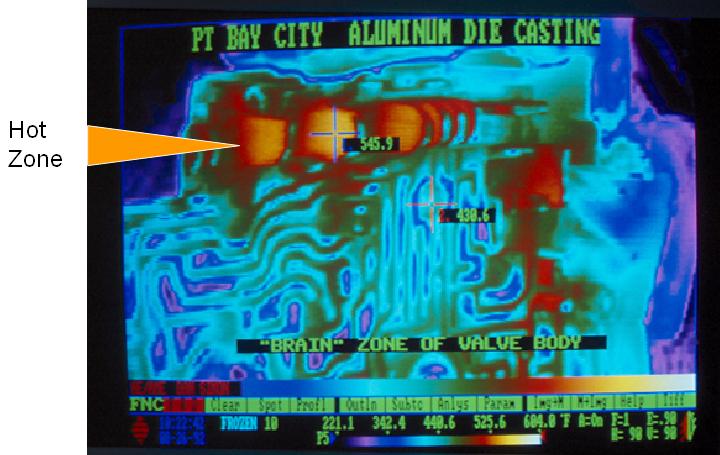
Die lube spray can be challenging, particularly when producing parts with deep cavities. Thermal imaging can provide a very helpful tool to diagnosing and fine tuning die lube spray patterns and amounts. In the example below, Figure 6 shows a transmission component with very deep cavities. As demonstrated in Figure 7, the deep cavities in this mold are difficult to cool – this information was used to optimize the die lube spray pattern and amounts.

 Figure 6 – Die with Deep Cavities Figure 7 – Hot Zone Identified
ROOT CAUSE ANALYSIS
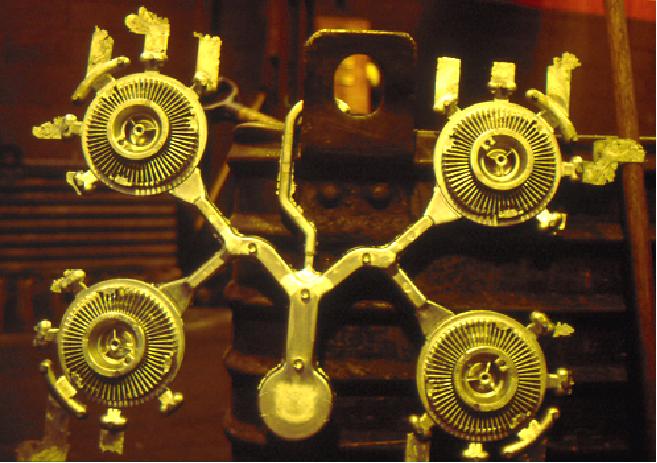
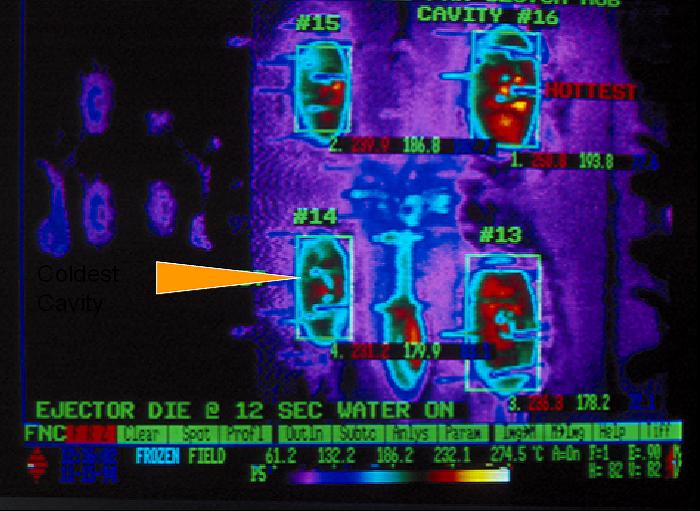
Many quality problems in die casting could be traced to many different possible root causes. The practical application of thermal imaging can simplify this process, and help to reveal the root cause much more quickly. In the example that follows, one cavity in a four cavity mold was experiencing excessive porosity – the other three cavities were producing castings of acceptable quality.
The parts shown in Figure 8 are for a viscous drive hub for a vehicle cooling fan. As shown in Figure 9, cavity # 14 (with the excessive porosity) is the coolest of the four cavities. This could point to the cause of the porosity problem, but further investigation is required.
Figure 8 – Viscous Drive Hub 4 Cavity Die
Figure 9 – Thermogram of 4 Cavity Die
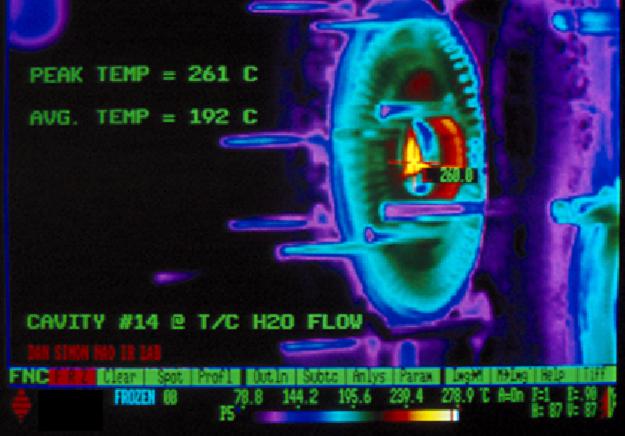
With the use of a 3x infrared telescope, a more detailed close-up inspection of cavity #14 is made possible.
Figure 10 – 3x Thermogram of Cold Cavity
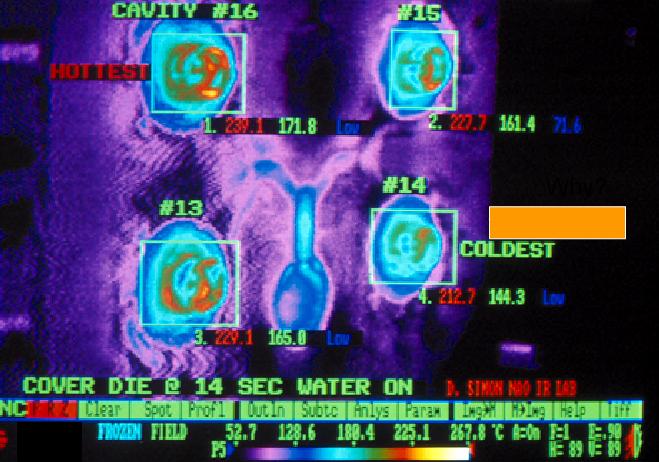
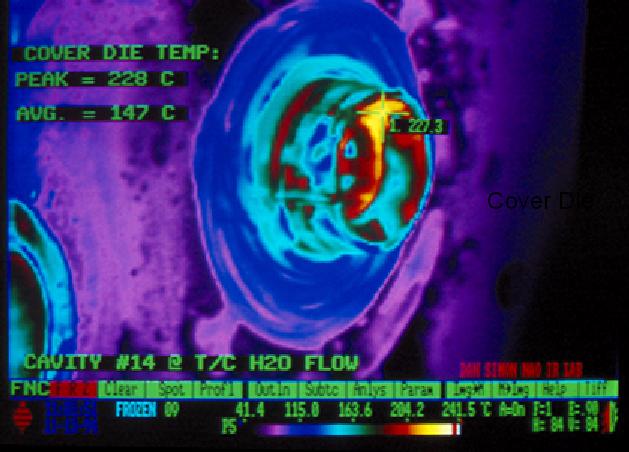
Both the cover and ejector dies must be observed and thermally measured to assure that the ROOT cause of the cold cavity is found. The thermogram in Figure 11 shows the heat pattern in the cover die, while the image in Figure 12 is captured with a 3x infrared telescope.

Figure 11 – Full thermogram of cover die
The thermogram in Figure 12 shows that excess die lube has been dripping into cavity #14 – causing the cooler region and the porosity.

Figure 12 – 3x Thermogram of Cover Die Cavity #14
SUMMARY
Occam's Razor – also known as the law of succinctness states “... of two equivalent theories or explanations, all other things being equal, the simpler one is to be preferred.” Albert Einstein restated this law as “make everything as simple as possible, but not simpler.” Die casting is a very complex and complicated process, and there are so many variables and parameters to control and monitor – however, thermal imaging provides for the most simple method to monitor all these variables without oversimplifying the process. The goal of optimizing die casting with thermography is to achieve thermal balance. By working through the steps of the process, we can:
- Smooth out hot spots, prevent soldering.
- Not over cool any portion of the die, thus saving die lubricant costs.
- Maintain reasonable temperature uniformity across die surface (maintain flatness of part).
- Begin to shorten cycle times without creating thermal extremes.
- Optimize through-put once thermal balance is obtained
REFERENCES
1. Huang, J., Bishenden, W., Blackburn, J., “Surface Emissivity Property in Aluminum High Pressure Die Casting Engineering,” InfraMation 2003


